
You'll have to take my words for it when I say that I finished this project in July, ahead of the crazy heat wave we had in August, and certainly ahead of Autumn, the season for which this is intended. My dad's reaction said it all: "Why have you sewn a jacket? It's too hot to wear it right now!"
The thing is, I hardly ever sew ahead of the season, especially for Autumn. Sewing summer clothes has just been more tempting. Oh wait - I've even confessed this 5 years ago here!
Unfortunately, the heat wave, and the swollen eyes and other allergic reactions that have been bothering me since then have made photographing this quite challenging. So you can probably imagine my joy when my eyes improved somewhat (as mysteriously as they deteriorate) this week, which gave me a short window to snap a few pics. I know that my eyes still look tired, and probably add a few decades to my face, but I just couldn't wait any longer!
Ta Dah!

I've always liked the design of the Sapporo. It's no surprise - I've enjoyed using a couple of Papercut patterns before, and like their modern style. I won't lie - their beautiful packaging may have something to do with my affection, too.
The Sapporo is also one of the most coveted indie patterns out there since its original launch. Initially, though, the pattern only came in 3 sizes, and I resisted because I didn't fancy grading so many pattern pieces.
Then the amazingly talented and brave Mie from Sewing Like Mad came along, and wrote this fantastically detailed post, identifying quite a number of errors in the drafting of the original pattern and instructions. I cannot thank her enough! Papercut promptly pulled the pattern, and relaunched the Sapporo 2.0 with more sizes and options. Lucky for me, this is the version I bought.
As someone who has always enjoyed the technical aspects of sewing, I found Mie's post extremely insightful. Understandably, after spending hours and hours checking and explaining the issues on the her blog (and then probably more hours rewriting before hitting the publish button, as goodness knows how hard it is to criticise an indie pattern), she did not wish to do the same again for the updated version, as she no longer had the desire to make the coat herself.
So, having checked through all the points she identified, and then made the coat step by step myself, I thought I would try and offer some commentary at the end of this post to discuss whether Sapporo 2.0 has address all the errors.
So, having checked through all the points she identified, and then made the coat step by step myself, I thought I would try and offer some commentary at the end of this post to discuss whether Sapporo 2.0 has address all the errors.
But before then, can we spend a bit of time swooning over my new jacket?

The back

I had a remnant of this camel cotton twill from my Robson trench, and also 2 metres of a cool, steel coloured twill from my stash. Is it bad that I can't even remember where I got it from? Anyhow, I was pretty excited when I cooked up this little stash-busting combo.
The lining was picked up during my travels (remember exotic holidays and international travel?), from Bangkok, I think. I don't know what the composition is, but it is soft, drapey, crease-resistant, and frays like crazy. I love its colourway and how it complements the outer fabrics.

I've spent a bit of time (ok, hours) studying other versions online (which is when I came across Mie's review), and decided to cut a size 1, and made the following changes:
- I took 5cm off the length, spread over 2 places. I chopped 2.5cm from the top, which meant that I had to reduce the fullness of the sleeve (I then spread this over 3 places at the top of the sleeve, tapering down to nothing at the wrist end), and also 2.5cm from the bottom around the short fusing line. This did mean that almost all the pattern pieces needed adjusting, but I wanted to distribute my shortness evenly.
- I shortened the sleeves by 4cm, from the middle of the sleeve.
- I added 2.5cm to the depth of the pockets, on both of the front pieces. I can report that the finished pockets were the perfect size.
- I added a few pieces of interfacing, including the front lapels, and both sides (top and bottom) of the angled front seams. Warning - this pattern really is a big fabric and interfacing eater!
- I included slack to the lining, by adding 2.5cm to the centre back of the lining piece, and sewed pleats at the centre top and bottom.
The (hidden) pockets and the angled seams are definitely thankful for the extra interfacing

For a jacket, especially given how many pattern pieces there were, this was a pretty easy sew. There's no buttons or buttonholes to make, for starters! You also don't have to worry about fitting too much - it's designed to be oversized.
And I have to say, even though I had some worries about being drowned by an oversized coat, I absolutely love how it's turned out. Stepping out of my comfort zone has paid off. I feel super chic in this, and it's perfectly practical.
Now, let me honour my earlier promise to you, and finish where Mie left off. I've copied and pasted the key issues that she pointed out (in bold), and added my comments on whether each of these has been addressed (in red). Note that of course I can only speak to size 1, but I would hope that after a revision, all issues would've been triple checked. Here goes:
a) Front bodice top and bottom seam not matching up - These pattern pieces matched up perfectly in the revised pattern for me. No longer an issue.

b) Lining too short in two ways - this has been addressed by the revision. Both the missing seam allowance and an intentional overspill have been added. However, No pleat has been added to the centre back in the pattern - it may not be needed, but I added a 2.5cm one to my version out of habit (see some resources discussed here).
c) Instructions to wait to press bottom hem after lining has been sewn shut - now updated. You now iron the hem like a normal person 😁
d) Front lining not wide enough either and impossible to actually check length because of front bodice top and bottom seam not matching up - No longer an issue as per the above. I particularly liked the added pleats at the bottom of the front lining, and think it is a neat way to address the length differential caused by the mitred corners and the overspill. Nice touch!
Can you see the little pleat at the mitred corner?
The bottom line is, had I not known about the older version, I would've said that this is a brilliant pattern that came together nicely. The hidden pockets, mitred corners, the little front lining pleats and the underarm thread chain all impressed the inner sewing geek in me. Kudos to Mie for flagging the issues in such a constructive way, and kudos to Papercut for taking the points on the chin, dealing with them, and also taking the opportunity to expand the views and sizes. I liked the step by step guide with photos here, which supplement the instructions nicely.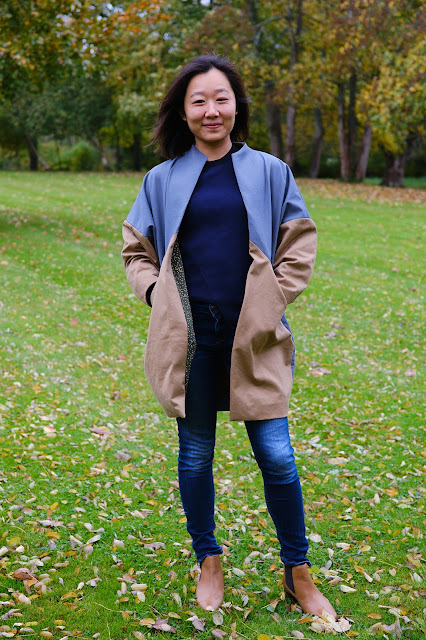
e) Sleeve cuff double layered with outer/main fabric and both layers sewn to armscyee creating bulky seams --This has been updated, with sleeve facings and lining pieces provided. There's even a "thread chain/lining ribbon detail" to keep the sleeve lining from twisting. Note that this cannot prevent you from twisting the arms during the construction process... don't ask me how I know!

f) Unnecessary hand sewing of lining to both armscyes. The whole lining sewing process shows a lack of understanding how to sew a lining in a coat -- With the changes above, the instructions now have you bagging out the lining, with a gap in the lining side seam. This is in line with how I have bagged out coats/jackets in the past, and worked fine for me.
g) Missing seam allowance on mitered corner --Now included. See picture above
h) Strange sleeve cap/cuff shape - doesn't look to have been changed. The shape still looks a bit pointy to me, but I don't have the old version to compare it with. I didn't smooth it out on purpose, and have not noticed any major issue with the sleeve. I'm treating this as a design element.
The bottom line is, had I not known about the older version, I would've said that this is a brilliant pattern that came together nicely. The hidden pockets, mitred corners, the little front lining pleats and the underarm thread chain all impressed the inner sewing geek in me. Kudos to Mie for flagging the issues in such a constructive way, and kudos to Papercut for taking the points on the chin, dealing with them, and also taking the opportunity to expand the views and sizes. I liked the step by step guide with photos here, which supplement the instructions nicely.

All in all, I found this to be a very enjoyable project. I'm proud to have stepped out of my comfort zone, and trying a totally different and rather bold silhouette. The hype about the design of this indie pattern is well deserved, despite the "blip" about the initial errors. What we've ended up with, named Sapporo 2.0, is a well designed pattern with more sizes and options than before, which should now come together nicely. I would, now, wholeheartedly recommend this pattern to you all. No, I'm not on commission (I don't even do affiliated links), and more than happy to answer any questions, however geeky 😉
Alice this is great! Thank you so much for taking the time to do this investigation. I've had many asking me about the second version and now I'm going to send them to this post. In fact I'm going to update my post with a link to your post. Thank you so much on the behalf of the sewing community! And you look great in your new coat!
ReplyDeleteAw, thank you very much! I feel privileged to be able to follow- up from your review, and do hope that it helps someone. In many ways, I'm relieved that the update worked well, because it is bloody difficult to criticise an indie pattern (I struggled with the made by rae geranium and spent ages choosing my words), so we are all grateful to you for raising your concerns in the first place. Now it has a happy ending😊
DeleteYour coat is stunning! Great info here. I've been tempted to see this coat and can now do so with this reassurance. Thanks for taking the time to document your experience!
ReplyDeleteSo glad you found it helpful! Can't wait to see your version ;)
DeleteI have been eyeing this pattern and finally bought it after reading your review which I saw from Mie at Sewing Like Mad's blog. Thank you!
ReplyDeleteThat's great! Thank you for stopping by, and I'm pleased to have been helpful :)
DeleteThanks so much Alice! I brought this pattern without doing any research then when I went to the fabric store, the lady at the counter and a customer told me about the old issues which made me very nervous but feel so much better after reading your post. Just one question, Would you recommend going down a size? I also heard it is very oversized
ReplyDeleteSo glad I could be of help and reassurance, Monique. Sizing down or not will of course depend on the look you are going for, but there is plenty of design ease included within this pattern. For your reference, my measurements are closest to a size 2, but I cut a size one, and it's still plenty roomy, and still look like it's intentionally oversized.
DeleteHope this helps! Do drop me a link once you've made yours :)
Hi Alice,
ReplyDeleteThanks for your helpful blog. You've helped me feel empowered to try out this pattern now with your review and great suggestions. It looks like the jacket comes with a lot of ease, and I was wondering if you'd be willing to share your body measurements so that I can understand how size 1 is fitting on you. I am 32''/26''/35'' and I think I would go with size 2, but I wanted to double check with your choices before I cut up my fabric. Thank you so much and happy holidays!
Happy holidays to you, too. That's great - pleased to be able to help. Yes, there's generous ease built-in here. My measurements are 32/26/34 (we are almost body twins), and I cut a size 1. You can judge by how it looks on me to decide for your own sizing.
DeleteHello, thank you for the detailed post on the pattern updates. I have wanted to make this coat for years but have been hesitant! I’m glad there is now an update addressing all the identified issues. Two quick questions, if I may, can you tell me why the pleat near the mitred corner is needed? I can’t quite understand it (though I appreciate your photo) and wondering if I can remove this dart? I was also wondering about adding a pleat to the centre back as you have done - do you think this a good idea? Would you do it again or not worry? Thanks very much, Meg
ReplyDeleteHi Meg, very late to respond (sorry) as I didn't see this until now. 1) the pleat is needed because there is now some slack built into the lining piece, making it a bit longer than the coat. Whilst this isn't normally an issue, due to the mitred corners, without the dart there would be excess lining to deal with, so in my view the dart is necessary. 2) Yes I would still add the pleat to the lining, which gives it a bit more room and reduces any strain on the (typically not stretchy) lining. I would do this again. Hope this helps!
DeleteI've sewn the Sapporo Coat three times and I had no trouble with the original pattern, but would like to get the new version. I guess I will email Papercut to see how to go about getting the new revised one.
ReplyDelete