Showing posts with label tutorial. Show all posts

Monday, 2 August 2021

Sew your own period underwear - a comprehensive introduction

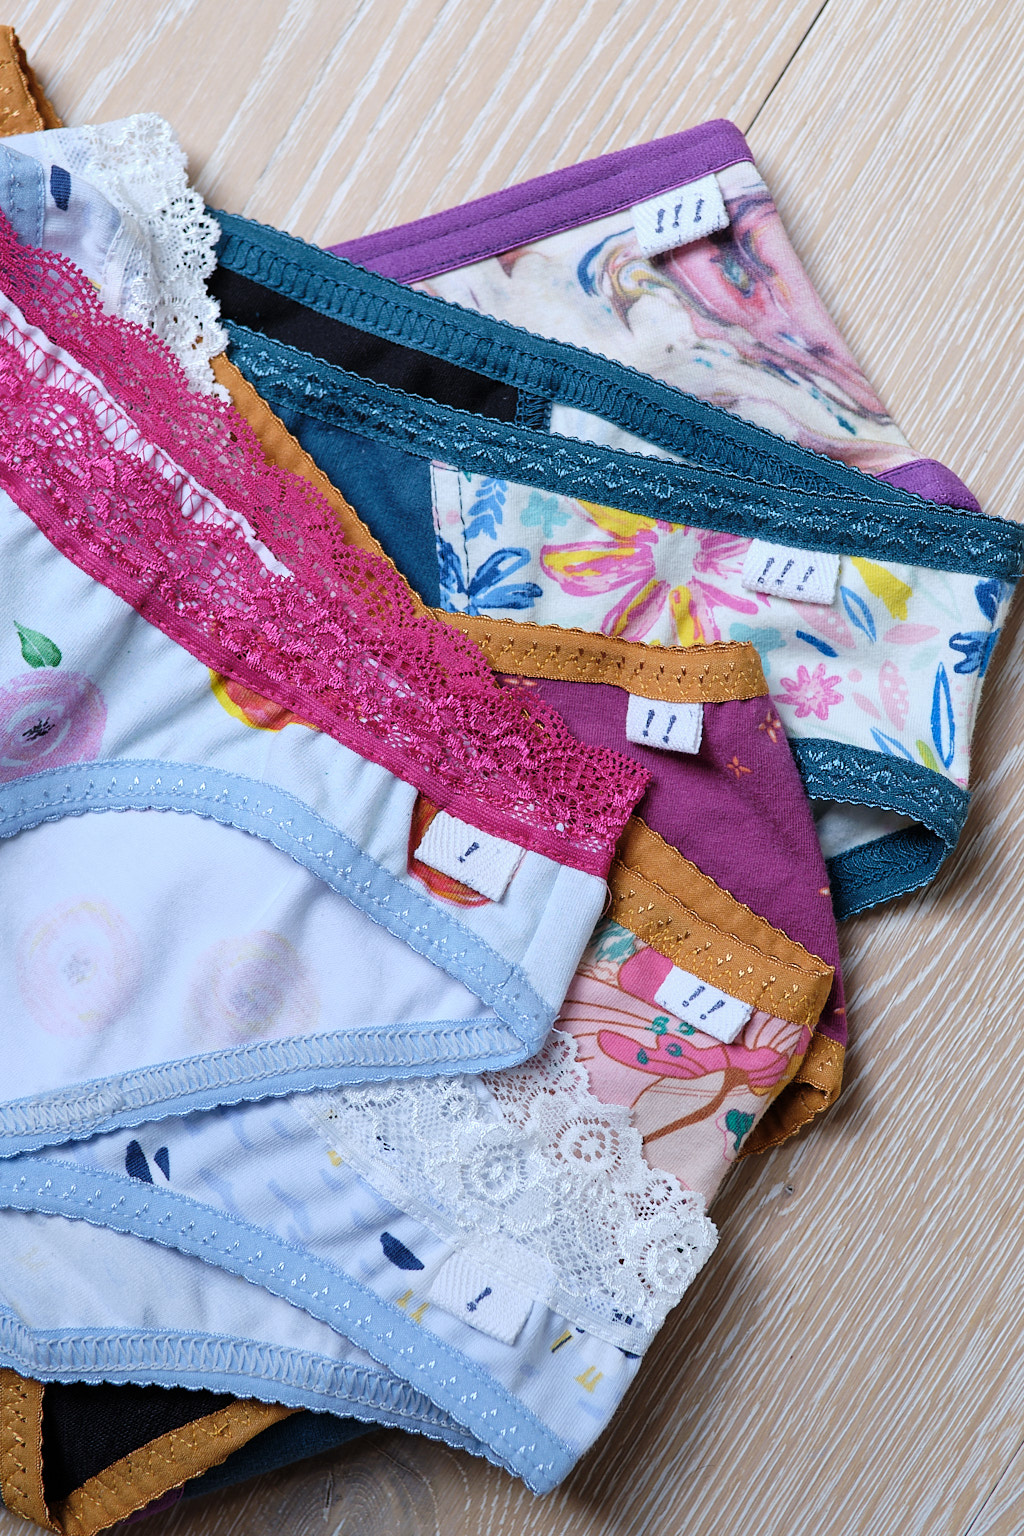
This is the first of a series of posts that I will be sharing on sewing your own period underwear. It’s a bit of a whopper!

Warning: this post contains frank and personal discussions about periods. Please feel free to scroll away if this you are not a fan of TMI.

TMI intro – what has led me to make my own period underwear

Periods and I have had a difficult relationship, even though we’ve muddled through together for nearly two decades. I used to absolutely dread it, because I would be curled up into a ball and drugged up for a day or two each month due to deliberating cramps. It was always an embarrassing thing to explain to my managers and colleagues as well. Now, after baby, my cramps have eased (thanks Freya!) but I’ve swapped them for hormonal migraines. The joy!

I could never get on with tampons at all, so have been a pad user for the majority of the time. I started using a menstrual cup a few years ago, and after a dodgy start (think – late arrival at work due to lengthy retrieval of cup😅), I’ve grown really fond of it. It has transformed my sleep (no more waking up at 5am fearing a leak), my exercise (it gave met the confidence to show up at pole classes in my little pole shorts) and made me feel a lot better about sending less disposable products to landfill. I also enjoyed learning about my “flow” as well. However, on most days (when I'm out and about) and at night time, I still used a pad as back-up for fear of leakage (even though this hardly ever happens).

A few years ago, I became aware of Thinx, and as a result, period underwear as a new concept. However, the price tag and the international shipping from the US put me off. When ASOS UK started stocking them, I invested in a pair but wasn’t happy with the fit. However, a seed was sewn in my head from then that perhaps one day, I will make my own.

Fast forward a few years, I've gone all out and made 6 pairs in one go! This entire project was finally prompted by potty training my toddler, which made me look into making reusable training underwear for her, a project that would require similar materials. By now, not one pair of toddler training underwear has been made, but mummy has 6 pairs of period pants prototypes 😉 The truth is, once I got started, and my juices flowing (no pun intended), I couldn't stop (and could barely sleep). There were so many options and so many ideas! 

sew your own period underwear pants panties thinx

Thursday, 22 October 2020

A little update and a tutorial (easy hacks for a FREE T-shirt pattern)

It’s been a while, my dear readers. I’ve been sewing (colour-blocked Sapporo jacket anyone?), but not quite blogging about them just yet. Truth be told, I’ve been struggling health wise since Aug, where my eyes are swollen and red all day long due to a suspected allergy to an unknown allergen. Sigh. It’s uncomfortable to say the least, and not very photogenic at all! Initially I thought that it would pass within a few days, then a couple of weeks, and now over 2 months have passed… you know how it is! On the plus side, I am seeing specialists and trying all sorts of things to put this frustrating chapter behind me.

That’s enough doom and gloom for now! We are all otherwise doing fine during these crazy times, and consider ourselves very lucky to be staying safe, and enjoying quality family time together.

This brings me to my next point – I have a little tutorial to share with you today, which features cute photos of Freya. She is over on the Flamingo Fabrics blog today, modelling some easy hacks that you can make to their FREE kids T-shirt pattern. Yep, you read that right – there is a FREE (via newsletter sign-up) T-shirt pattern in town! It’s lovely (though to be fair, any T-shirt pattern with a seam cover detail gets my vote), and I’ve shared a few ways and ideas of jazzing it up.

Enjoy and stay well!

Monday, 25 November 2019

DIY Teepee tutorial

Who wants a little teepee? Sorry, let me rephrase that - who doesn't want a little teepee? I made one for Freya's first birthday, and seriously wanted to steal it and call it my own. 

Now you can make your own, too! 
DIY teepee tutorial cotton canvas-1

DIY teepee tutorial cotton canvas-2

DIY teepee tutorial cotton canvas-3
Check out my step-by-step tutorial with pattern template on the Minerva blog - can't wait to see your own versions! 

P.S. I can confirm that it fits a petite adult (me) with room to spare. 

Saturday, 22 June 2019

Panda outfit and a flatlock tutorial!

One of my favourite pieces of Freya's ready to wear clothing was a pair of bum panel leggings. From the front, they looked like a cute pair of leggings with sweet polka dots, but as she rolled over, what do you know? There was a ladybug staring right at you. Naturally, once she has outgrown them, I wanted to make my own for the next size. 
brindille twig ringer tee mother grimm lockley leggings panda flatlock tutorial
One of the details on those ladybug leggings were that the bum panel was flatlocked, so I thought I'd go the whole way and recreate those, too. Since this took a bit of experimentation, and there's not that much out there on this topic, I wanted to do a little tutorial here, too. As a result, this post is going to be a long one, with lots of photos, so please make sure you are sitting comfortably. 

Outfit

First of all, a few words on the project. I bought this lovely Panda French Terry even before Freya was born, as pandas are obligatory for a half Chinese baby, right? 
brindille twig ringer tee mother grimm lockley leggings panda flatlock tutorial
I knew I wanted to make a long sleeve Ringer Tee with it, but wanted to complete the outfit without there being pandas everywhere. Then the light bulb moment came - bum panel leggings! 

brindille twig ringer tee mother grimm lockley leggings panda flatlock tutorial
I almost self-drafted the bum panel from the tried and tested leggings pattern, but then I came across the Locksley leggings by Mother Grimm. Having spent 4 years living in Cardiff, I have developed quite a soft spot for the Welsh people, who welcomed me wholeheartedly to their country when I was still a fresh faced teenager. I couldn't pass the chance to support an independent (tick), Welsh (tick), sewing-related (tick) business. 
brindille twig ringer tee mother grimm lockley leggings panda flatlock tutorial
Both the top and leggings were made straight out of the envelope, so to speak, in size 9-12 months. Both patterns were great, and an easy sew. The only tricky thing was the flatlocking, which I'll get to now! 
brindille twig ringer tee mother grimm lockley leggings panda flatlock tutorial
Tutorial

What is flatlock? 

Strictly speaking, you need a special, industrial machine to do a proper flatlock. It is a stretch seam with basically no bulk, which is why it's often used in activewear.

What I'm showing you today is a flatlock stitch done on an overlocker (or a serger, for those sewing friends across the pond). As I'm doing a "strong flatlock" (or "lapped flatlock"), it is not completely bulk-free, but as the seam allowance overlaps within the stitching, this seam is much more comfortable against the skin compared to a normal overlock. [*NB - you can achieve a complete bulk-free flatlock on an overlocker, but the resulting seam is much less strong and secure, so I don't like to use it on leggings. See the hemming section below).]

What you'll need
  • An overlocker/serger
  • Its manual
  • Matching/contrasting  thread

Machine settings

Please refer to your machine manual here. What we are doing is a wide, 3-thread flatlock with the left needle, which means that the left needle will need to come out. The tensions depend on your specific machine, and the fabric that you are working with, but for your reference mine are 0.5, n/a, 5 and 7. These are what my machine recommended for medium-weight fabrics, and worked a treat. I also leave my cutting blade engaged.

Preparation 

Before we start flatlocking away, I like to prepare the pattern pieces. The actual sewing part is quick and fun, so let's be patient with the preparation part :)

A key consideration here are the seam allowances, and this comes in two parts.

  • For the seams that you are flatlocking, the seam allowances will end up overlapping. My flatlocked seam is approx 5mm (the same as my wide overlock), and the pattern calls for a 10mm seam allowance. This means that I need to trim an extra 2.5mm (approx 1/8 inch) off these seams to enable me to sew them up as usual. In other words, I am trimming off the 2.5mm now from these seams on my cut pattern pieces before sewing, so that when I serge, I'm able to place the fabric in the "normal" position against the blade, trimming off the "normal" amount. Alternatively, you could do nothing now, and trim and extra 2.5mm as you sew, but this tutorial follows the method above. 
  • Secondly, for the seams that will cross the flatlocked seams, I trimmed the full extra 5mm off the seam allowances before sewing. This is because the flatlocked seams, although strong, are harder to secure. I secure them (as detailed below) with a few steps, but if you end up then cutting the tied ends off as you sewed your next seams, you have a risk of the flatlocked stitch unravelling. This step therefore requires you to consider all the seams that cross the flatlocked seams, and for these leggings, they are the inseams and waistline seams, as well as the waistband seams. 
Let's get sewing!

It goes without saying that you should try this stitch on 2 layers of scrap fabrics of the same weight first, before working on your actual garment. 

For a traditional flatlocked look, pin or clip the pieces with wrong sides together. I'd like the flatlock to be on the panda (rather than pink) side, so the panda side is facing up. This will make sense in a minute, I promise. 
brindille twig ringer tee mother grimm lockley leggings panda flatlock tutorial
Sew a long thread chain first. Then, place the fabric in the usual position next to the blade (see explanation in the prep section above). Check again that you have the wrong sides together, and start serging as normal. Once the seam is finished, continue sewing until a long thread chain is formed. 
brindille twig ringer tee mother grimm lockley leggings panda flatlock tutorial
You should have a seam that looks quite similar to an overlock, but a bit more scrunched up. The tension is a bit off, but this is okay as we want the off tension on purpose. 
brindille twig ringer tee mother grimm lockley leggings panda flatlock tutorialUse your fingers to even out the stitching slightly. This is where the long thread chain comes in handy! You'll be amazed by how much of it unravels as you even out the stitch. If you are flatlocking a long seam - leave an extra, extra long tail. 

This is what my seam looks like. 
brindille twig ringer tee mother grimm lockley leggings panda flatlock tutorial
Next, the magic step! Pull your fabrics on both sides so that the stitching loosens up. The seam allowances should overlap each other, and the loopers should appear on the right side of the fabric, enclosing the seam allowances on the panda (or your equivalent) side. Note - you must complete this step before sewing your next seams.  

So we have on the right side:
brindille twig ringer tee mother grimm lockley leggings panda flatlock tutorial
And wrong side. Note that if you prefer the ladders look, and want this on your right side, this is easy to achieve. Instead of pinning and serging wrong sides together, pin and sew with right sides together. 
brindille twig ringer tee mother grimm lockley leggings panda flatlock tutorial
You have a flatlocked seam! Now we just need to secure it. I go a bit crazy here, so I tie a knot (top tip - use a pin to position the knot close to the fabric - pictured below), fray check, and I also bar tack it within the seam allowance. And since I've already trim the other pattern pieces that will be intersecting the ends of the flatlocked seams, I know that I won't be trimming the secured ends off. This should make sure that your beautiful seams stay that way. 
brindille twig ringer tee mother grimm lockley leggings panda flatlock tutorial
That's it! Easy, right? 

Bonus points!

Want more? Sure! Some extra points for you. 
1) Don't have an overlocker? You can fake this with a sewing machine - see Taisia's tutorial here
2) This stitch could be used as a decorative detail, too. For example, it looks great on a raglan tshirt. 
3) It can also be a nice stitch used for mending ready to wear clothing
4) You could have a matching flatlocked hem, too! 

What I've outlined above is where we have the seam allowances overlapping each other (what I'm calling a "strong flatlock"), rather than having them next to each other and meeting in the middle (more of a true flatlock). For 2), 3) and 4) above, we need to aim for less bulk, and therefore the true flatlock. 

Let me demonstrate it on the hem. With hindsight, I'd actually recommend that you hem with a flatlock flat, rather than in the round. In other words, it would be better to sew the hem before the inseams. You could then start and finish in the seam allowance, so that the thread chains/ends will be nicely hidden in the inseams. 

First, fold your hem once to the wrong side as usual. You'll want to fold the full depth of the hem required for your pattern. 
brindille twig ringer tee mother grimm lockley leggings panda flatlock tutorial
Then fold again to the wrong side, by exactly the same amount. To achieve a neat hem, it's crucial to fold exactly the same amount over in these steps, making sure that the raw edge is right on the second crease/fold. You might find that pressing helps here. 
brindille twig ringer tee mother grimm lockley leggings panda flatlock tutorial
Next, disengage your cutting blade. Position the fabric slightly to the left so that the left needle catches the fabric, but the loops are hanging off the fabric. Before you sew on the fabric, remember to leave a long thread chain again at the start and end.  
brindille twig ringer tee mother grimm lockley leggings panda flatlock hemtutorial
See what I mean? Some of the stitching are on the fabric, and some off. 
brindille twig ringer tee mother grimm lockley leggings panda flatlock hem tutorial
 Now unfold the second fold, and pull flat. You should have on the outside: 
brindille twig ringer tee mother grimm lockley leggings panda flatlock hem tutorial
 And inside: 
brindille twig ringer tee mother grimm lockley leggings panda flatlock hemhem tutorial
Isn't it neat? Again, if you prefer the ladders, fold the opposite way - fold hem to the outside, and then again, before sewing as above. Now secure your thread chains, and you are done! 

Monday, 27 May 2019

Leggings, bummies, and DIY size label

As Freya starts to grow out of her 6-9 clothes, I've been working on some wardrobe essentials for her in 9-12. 
Brindille Twig Bummies Leggings
I made another pair of the trusted leggings by Brindille & Twig, and unlike last time, without drama. 

I also tried out their Bummies pattern, which is available for free!  I opted for the leg bands, and omitted the drawstring. They have been great for the recent warm days, mainly as a neutral-coloured nappy cover under a little sundress. 

The fabric was a combed cotton jersey that I picked up on Black Friday last year from Girl Charlie. 
Brindille Twig Bummies
Both are such easy sews, and let me warn you now that I'll no doubt be making more versions of these in the years to come. 

One thing I have not had to worry about before now was size labels. Apart from when I was sporting a huge bump, my size has been pretty constant. But churning out clothes for a rapidly growing baby is a whole new ball game entirely. Suddenly, we needed to know the size of every item, especially when I'm not the only person that dresses our daughter. 
Brindille Twig Bummies Leggings DIY label

After gathering some bits from my stash, I made a few DIY size labels. I wanted them to be clear, rustic looking, and comfortable against the super soft baby skin. I liked how they turned out, so wanted to share with you what I did in case it helps anyone. 

What I used:
  • 3/4 inch (19mm) wide white cotton twill tape
  • Stamp set with numbers and letters (each stamp here is sized 12x9mm)
  • Inkpad - I used a Versacraft one which is good for fabric
  • An iron

The rest is pretty simple. I cut a 6cm+ long strip of twill tape. Leaving around 1.5cm blank from the top, I did the 3 stamps snugly (and the width of the twill tape was perfect). Once dry, I ironed the strip over a pressing cloth (a bit of silk organza) for 20 seconds, on a cotton setting without steam (some say 2-5 minutes, but even with the iron moving, my tape and the ironing board cover got scorched after less than a minute). Once cool, fold your strip in half, and you should have 1.5cm of seam allowance above the stamp. You can trim down the seam allowance if necessary. Sew into the seam as desired. 

For these bummies and leggings, I sewed the label onto the centre back when topstitching the folded serged waistband elastic, with my normal 3-step zigzag.  I've actually batch made a few labels, including for the next size. If you wanted to do this, just remember to give the stamps a quick wipe after each stamp, so that you don't get too many ink "boxes" around the letter/number. 

Of course, you can get creative with this, playing with the size of tape, stamps, angles etc. I have a few funky stamps in my stash from the wedding planning/thank you card days, and may well experiment with a few designs next! 

Sunday, 18 November 2018

Papercut Undercover sweatshirt - nursing hack

Let's talk about breastfeeding today. Unusual for a sewing blog, I know.

Motherhood has been very kind to me - I had a very positive, intervention-free water birth, and baby Freya has been one healthy and smiley baby.

The only big challenge that I've faced so far was the breastfeeding. Before Freya was born, I was told how breastfeeding is "the most natural thing",  how "babies will crawl up to your breast and if left on your tummy skin to skin after birth", and how "it shouldn't hurt", and at worst "it will be a learning curve for both of you". 

And what a learning curve it was! My initial experience did not feel natural, baby had no idea where to go and preferred her own shoulders to my boobs, and it was bloody painful. 

Despite attending 3 antenatal breastfeeding classes, no one had warned me about the stress about being solely responsible for baby's growth/weight gain in the early days, the pain from poor latch/engorgement/blocked ducts, and how much of my day would be taken up with a newborn baby attached (did you know that when they say, "feed every 2-3 hours", you are supposed to count that from the start of each feed, and each feed could take well over an hour especially in the early days?). 

Don't get me wrong, I get all the benefits of breastfeeding. I just would've preferred to be forewarned about the difficulty of it so that I could be better prepared mentally. The key, as I've learned, was patience, perseverance, and getting help whenever you can. I know that what I'm saying above will not be relevant for most of you right now (well done and thank you if you managed to read on and got to this point regardless)- but if you found this post via Google because you wanted to make some nursing tops in advance of the arrival of your baby, you've heard it from me - breastfeeding can feel quite unnatural and difficult to begin with, and that is perfectly normal. 

Papercut Undercover Sweatshirt raglan zip Nursing Hack

Right, back to the sewing! After persevering, and finally succeeding with breastfeeding, I wanted to give myself a pat on the back, and reward myself with a few homemade nursing tops. 

After seeing one of my friends in a nursing jumper with zips down the raglan sleeves, I was inspired to make one for myself, to see us through the colder months. The pattern that I chose was the Papercut Undercover hoodie, and I teamed it up with a very cosy multi-fleck sweatshirt fabric from Guthrie & Ghani, together with 8' exposed metal zips (although with hindsight, 9' zips would've worked even better).  


Papercut Undercover Sweatshirt raglan zip Nursing Hack
This is my first time using a Papercut pattern (although the Anima pants pattern has been in my stash for a while), and the first impression was great. I loved the packaging, and how robust the pattern and instructions felt (both pattern pieces are instructions are printed on a huge piece of brown recycled paper). Since I tend to trace out the pattern pieces for my sewing projects, I was very happy with this feature. 

One thing to note is that this pattern (and I understand, other Papercut patterns) come with a 1cm seam allowance. This was perfectly fine, though I had to keep reminding myself not to sew 1.5cm seams on autopilot. 

Papercut Undercover Sweatshirt raglan zip Nursing Hack
Here's how I've turned this pattern into a nursing top. It's not difficult, though as it turned out, this pattern was not ideal for this project, as the front Raglan seams are slightly curved. There are plenty of similar styled patterns out there, and the hack below should work for them, too. 
  1. Add 1cm seam allowance to the front sleeve seams, all 4 of them (2 on the front piece, and 2 on the sleeve pieces). This is to allow for an easy insertion of the zips later on. 
  2. Split the neck banding pattern piece into two, based on the ratio of the length of the front and back neckline. Add an inch or so to the length of both pieces. The banding should be shorter than the actual neckline length, so that it would lie flat when finished. 
  3. Interface these seams with strips of medium weight interfacing which extended slightly beyond the seamline. 
  4. Stablised the front neckline (the bit between the zips) with clear elastic. Colette has a very helpful tutorial here. 
  5.  Sew the sleeve back seams. 
  6. Attach the banding pieces to both front and back necklines. 
  7. Insert the zips to the front sleeve seams. The easiest way to do this would be to sew a centred zip, but I wanted to push myself and learn a new technique, so I added exposed zips here by following this tutorial
  8. Sew up the inside sleeves and side seams in one go. 
  9. Add cuffs and hem/band. 
  10. Tidy up the loose overlocker chains, and where the zip ends with the neckline bands with a bit of hand sewing. 

Papercut Undercover Sweatshirt raglan zip Nursing Hack
 And that's it! So simple, isn't it? 
Papercut Undercover Sweatshirt raglan zip Nursing Hack
I'm so pleased to have pulled off this project, (thank you Freya, for napping well, and thank you hubby for freeing me up in the weekends to sew!) and just love how cosy it is. It's had so much wear that I'm struggling to remember how I managed to feed Freya without it! I'm also confident that it will last me long past the breastfeeding days. A real winner, don't you think?  

Friday, 12 September 2014

Kindle case no.2

It's been a while since my first Kindle case, which happened to be one of the first projects completed together by my loyal sewing machine and I. Since then, the boyfriend has become my husband, and the Kindle has certainly evolved a rather lot. How time flies!

As I'm heading back to Beijing to see my family and friends in just over a week's time (I can't wait!), and my dad reads a lot, and I mean, a lot, of geeky English books (he's a bit of an academic), to the extent that 4 bookcases have become 8 in a matter of 2 years, and their home study is rapidly running out of space -- the poor desk in there must be worrying about its place and its eventual fate on a daily basis. 

So, as an attempt to avoid an overweight luggage fee for my trip, as well as to ease the pressure on the home office space situation, I've bought my dad a Kindle, and loaded it up with the books that he would like. To top it off, I wanted to make him a cover for it. I know, I'm spoiling him rotten! 

I wanted to make something a little more fancy than a pouch this time, so I found this wonderful tutorial. It was really well-illustrated, and you can't go wrong! 

Here's the complete gift:
When you open up the cover, the Kindle is in the pouch:
And it acts as a typical book-cover style holder, too, for reading on the go, thanks to these clever little corners:
Before slipping it back in your bag, there's an elastic to hold everything in place: 
I must admit, I had given this project a lot of care and attention, ensuring that everything lined up (especially with the stripes), all the corners are nice and sharp, and the ends are all tied up subtly on the wrong side. I am really happy with how it's turned out! I love how multi-functional it is, and how easy it was to put together. So if you are in the market for a Kindle cover, do pop over to Deborah's blog and you won't regret it! 


Sunday, 10 August 2014

Small bust adjustment - part 3

After the recent Sew Dolly Clackett dress, it's time for the 3rd instalment of the SBA tutorials series. This part will deal with a SBA on a princess seamed top or dress. This is probably the easiest adjustment compared to Part 1 and Part 2, so enjoy the simplicity!

First thing first, I know that some find princess seams a pain to sew. Having sewn quite a lot of princess seams (my wedding dress had such construction), I have found that the a smooth finish can be achieved by following this tutorial

Now this little tip is out of the way, let's get started with the tutorial. 

I say that princess seams are super easy to adjust, because all you need to do is to "shave off" some of the excess curve. Normally I take the piece with the outside curve, i.e. the side front (I'm using the By Hand London Elisalex pattern here), and simply smooth out the curve around the bust area. 

I'm demonstrating this here using the pink highlighter:

A close up:

I use the French curve for this, but this can also be achieved free hand. 

The next step is to cut off the excess following the pink line, and then you are good to go!  

Note that I often find that the pattern piece with the outside curve (side front in this case) is prone to stretching, and end up being longer than the inside curve piece (centre front in this case), so "smoothing out" the curve actually helps with this problem. 

I should add the usual caveat now that as with the other 2 parts, this is simply what I do to adjust for a smaller than B cup bust, rather than the "right" way. It works for me, and I hope it does work for you too :)

As always, any questions please ask, and I'll do my best to answer. 

Monday, 22 July 2013

Tutorial: make your own dropped waist dress!


Would you like to make your own dropped waist dress? It was very simple indeed! Just follow the simple steps below:

1. Find a dress pattern that you like, preferably a princess seamed one (as darts may be harder to shorten) without a waistline seam. If you are struggling, perhaps give Simplicity 2146 a go? I would recommend using a tried and tested/toiled pattern for this, as you know how well it fits and how long the finished length is. 

2. Determine where you want the "dropped waist" to be on your body.

3. Shorten the pattern pieces accordingly, remembering to leave the length for the seam allowance. If in doubt, leave longer rather than shorter. 

4. Make up the short dress/long bodice according to the altered pattern from step 3, without inserting the zipper. 

5. Cut out a rectangle for the skirt piece – the size for this will depend on how long and how full you want the dress to be. For reference, my rectangle was 150cm x 30cm, but do bear in mind that I'm quiet short - you are likely to need a wider piece. 

6. Gather the long edge of the rectangle evenly to fit the bottom of the long bodice from step 4. 

7. Attach 4 and 6 with right sides together for the full length, leaving the centre back seams open.

8. Insert zipper - I used a lapped zipper, but you are free to pick your own! 

And that’s it! You’ll have your very own dropped waist dress! Do feel free to shout if you have any questions!


Saturday, 1 June 2013

Tutorial: how to add lining to a skirt with waistband

As promised when I shared my ultimate work skirt with you, here is a tutorial on how I added lining to the skirt when the pattern did not call for one, with the added waistband. If you are not using a waistband, I hope this could still be useful but you would have to pick and choose the relevant steps.

The pattern I used was McCalls 3830 -- if you haven't tried this already, please do! It has quickly become one of my favourites, as it's so simple but gives great results.


Please allow me to say that the steps below set out how I added lining to McCalls 3830, mainly by studying a RTW skirt that I had. This method may well not be the right or only way to achieve this, but as it worked for me, I thought I would share it in case it would be of help to someone.

Before we start, you may want to decide whether you want to make any design changes. I added a waistband by following this helpful tutorial on Coletterie here. My waistband was 2.5cm wide, but if I were to do this again, I would widen it to maybe 3cm or 3.5cm.

Now the lining. You will need slightly less lining fabric as the fashion fabric, as you won't need to cut out the waistband or the waistband facing pieces from the lining. To choose lining fabric, broadly anything that is marked as "lining" in the shop should work. However I tend to go for lightweight/thin and silky material (a faux habotai, or a lightweight satin), and if they are anti-static, that also helps. You could try and match the colours, contrast it, or insert some funky lining that no one would be expecting -- anything goes!

Part A: Making the skirt and waistband 

I have not gone into that much detail here, as each skirt pattern is different, so the key is to follow the pattern instructions.   

Step 1: Make darts, stitch skirt sections together, leaving room at the top of the centre back seams for the zip

Step 2: Stitch waistband sections (after interfacing them) together, leaving the centre back open. Do the same for waistband facing sections


Step 3: Attach waistband and facing right side together at the top edge 


Step 4: Attach skirt to waistband with right side together


Step 5: With the waistband facing flipped out (see picture below), insert the zip ensuring that the top edge comes in slightly below the top of the waistband (rather than the facing)


After step 5, your skirt should look something like this:

Part B: Prepare the lining 

Step 6: Cut the lining pieces
I used the skirt pattern pieces, without any change. I lay the pattern pieces so that the centre back seams of the skirt fall right on the selvage of the lining fabric. I often find that lining fabric frays very badly, so using the selvage would make your job a lot easier later on.

Step 7: Make tucks rather than darts in lining pieces
One thing that I noted from examining my RTW skirt was that whilst the skirt pieces had darts to fit the contour of the body, the lining pieces adjusted for this by tucks, leaving more ease and flexibility in the lining. So I did the same, and it worked. That said, I think if you made darts in the lining pieces to match the skirt pieces, that should not be an issue, either.


Step 8: Stitch lining sections together, leaving space at the top of the centre back just slightly longer than the zip length. 

Part C: Attach lining to skirt

Step 9: Turn the skirt inside out, flip the waistband facing back inside the skirt (on the right side). After this you should have the top of the skirt seam which is attached to the bottom of the waistband seam at the very top, ready to also have the lining sewn to it. Pin the top of the lining to those seam allowances with wrong sides together. 

You will see here that I have already graded the seam allowances so that the waistband seem is shorter than the skirt seam. 
When you are close to the centre back, where the seams are folded over, pin as far as you can, leaving a small gap. 

Step 10: Sew as pinned, within the seam allowance. I did a 1cm seam here, but really anything within the 1.5cm seam allowance is fine, so that this new stitching won't show on the right side of the skirt. 
 Step 11: Hand finish the small gap close to the zipper

Step 12: Slip stitch the lining to the zipper tape, leaving extra room at the bottom for the tab 
Part D: Finishing touches

Step 13: Press 1.3cm if you are using a 1.5cm seam allowances throughout (or just a slightly narrower seam than whatever you are using) down on the open edge of the waistband facing. 

Step 14: Fold the waistband facing to the inside of the skirt, overlapping the folded edge over the seams (bottom of waistband and top of skirt). Pin on the right side of the skirt. 


 This is what it looks like on the inside:
Step 15: Stitch on the right side of the skirt. I went very slowly so that the stitching fell right into the previous stitching line so it's almost invisible
Step 16: Hem
I pinned the hemline for the skirt layer first, blind catchstitching it by hand (see Sherry's tutorial here). Then I pinned the skirt lining to be a tad shorter than the skirt itself, so it won't be seen easily when I'm wearing it (despite a part of me wanting to show off the beautiful lining!)

Can you see how the pinned lining ends slightly above the skirt hem?
And there you have it! A fully lined skirt with a waistband! Give me a shout if you have any questions or would like to share your experience :)
Related Posts Plugin for WordPress, Blogger...