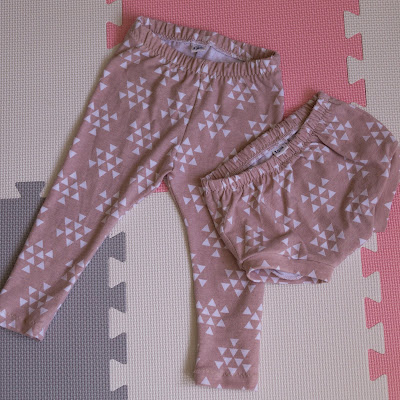
Tuesday 24 December 2019

Season's greetings with matching outfits

Merry Christmas, my lovely readers! I hope you have an amazing festive break wherever you are. We came back from a short break in Portugal last week, where these pictures were taken. 

It's been a while, but I'm back to share some more mummy and daughter twinning outfits with you ;) 

Remember the Cheyenne tunic that made me feel like a cool, chic artist? I was lucky enough to have some of this amazing chambray leftover, so naturally I had to make something matching for Freya. 
I was kindly given this super cute vintage pattern during the Pattern Swap 2019, which was perfect for what I had in mind. It's loose fitting, comfortable, flexible, and not to mention so, so adorable. 
The pattern is from the 80s, and includes a pair of dungarees as well as a blouse with different sleeve lengths. It only comes in one size though, so I had to crack on and make those dungarees before Freya outgrows it.  
I particularly love the front patch pocket and the princess seams for the legs. The crossover back straps are great, too, though I've altered the front such that it is knotted rather than buttons, as a nice grow-with-me option. I also added elastic to the leg hems, for the same purpose. 

A well drafted pattern without too many pattern pieces, together with good instructions, made it a pretty easy and satisfying sew. I really love twinning with my little girl, and hope that it will be many years before she resists my twinning attempts. 
Let me stop here and wish you all an early Happy New Year! May 2020 bring you lots of joy, happiness, and wonderful health! See you in the New Year. 

Monday 25 November 2019

DIY Teepee tutorial

Who wants a little teepee? Sorry, let me rephrase that - who doesn't want a little teepee? I made one for Freya's first birthday, and seriously wanted to steal it and call it my own. 

Now you can make your own, too! 
DIY teepee tutorial cotton canvas-1

DIY teepee tutorial cotton canvas-2

DIY teepee tutorial cotton canvas-3
Check out my step-by-step tutorial with pattern template on the Minerva blog - can't wait to see your own versions! 

P.S. I can confirm that it fits a petite adult (me) with room to spare. 

Wednesday 30 October 2019

Embroidered lace dress

embroidered lace dress vogue 8766 back
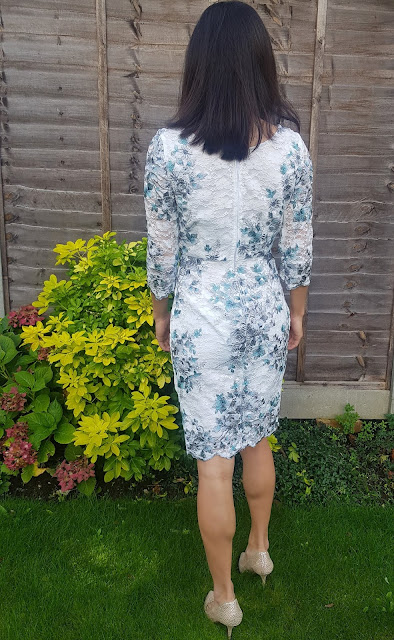
In advance of the festive season, I've made a little party number! How amazing is this embroidered lace? 
embroidered lace dress vogue 8766 back
My thoughts on the fabric and the pattern (Vogue 8766) are discussed here in detail, on the Minerva blog. 

Tuesday 27 August 2019

Summer romper


Do you ever see fabrics that you just have to have? This ice lolly print was certainly one of them for me. Sorry, I mean, for Freya. Freya needs this! Who am I to argue? 
peekaboo doodlebug romper ice lolly jersey
I knew that it would be perfect for a little summer romper. I have been on the hunt for the perfect romper pattern, which even involved self drafting one (it worked well, and even had ruffles, but I have not managed to blog about it). Until I came across the Doodlebug Romper by Peek-a-Boo patterns -- all my romper prayers have been answered! 
peekaboo doodlebug romper ice lolly jersey
It's a simple design that has an envelope neck, snap crotch closures, and comes in 2 lengths for both the sleeves and legs. There's even an option for a kangaroo pocket! 
The instructions were informative and professional, and the romper sewed up a treat with no issues. It was quite a satisfying project -- I found a matching ribbing easily, my machine was happy twin stitching the hem, and even the snap closures didn't give me any trouble. What more could I ask for? 

That's it for now - just a short post to show off the little summer romper. Time to enjoy the mini heat wave! 

Sunday 11 August 2019

Geranium outfit for Freya

I couldn't resist making a sweet bumble bee outfit for Freya, and adding those flutter sleeves to show off her chubby little arms. 

This is another Minerva Maker project, and I'm really loving being part of the team! 
Made by Rae geranium dress top flutter sleeves
You may have guessed it - the pattern was the Made by Rae Geranium, and you can read all about the ups and downs of the project on the Minerva site here

Spoiler alert - I appear to be the only one in the universe that didn't fall head over heels for this pattern. Trust me, it was not easy to be even slightly critical over an indie pattern, especially one that has basically reached "cult" status. On the other hand, it is also important to me that I am completely honest in my reviews. As an attempt to be constructive, I will try and post a tutorial to improve the back closure issue when I next make this pattern.  
made by rae geranium nappy cover outfit
I made the matching nappy cover using this free pattern, and would highly recommend it. 

Saturday 3 August 2019

Cheyenne tunic in star chambray

Hi guys! I'm back on Minerva today sharing my proud make of the Cheyenne tunic with you. Here's a quick sneak peek! 
hey june cheyenne tunic in chambray


hey june cheyenne tunic in chambray
Although it wasn't a quick sew, I love how it's turned out. Read more about the construction and the details here

Wednesday 3 July 2019

Sewaholic Robson Trench

My husband: Do you think you could turn my new suit trousers up? 
Me: I don't think I'm skilled enough to do that I'm afraid. 
Also me: Hey, look at my latest make... 
Entering - my new Robson Trench! 

Sewaholic Robson Trench Camel Twill
And check out the details:  
This is my first make as a proud Minerva Maker. Read all about the making of the trench on Minerva here

And yes, as a loving wife and mother of his child, of course I did turn up the suit trousers. Two pairs! 

Saturday 22 June 2019

Panda outfit and a flatlock tutorial!

One of my favourite pieces of Freya's ready to wear clothing was a pair of bum panel leggings. From the front, they looked like a cute pair of leggings with sweet polka dots, but as she rolled over, what do you know? There was a ladybug staring right at you. Naturally, once she has outgrown them, I wanted to make my own for the next size. 
brindille twig ringer tee mother grimm lockley leggings panda flatlock tutorial
One of the details on those ladybug leggings were that the bum panel was flatlocked, so I thought I'd go the whole way and recreate those, too. Since this took a bit of experimentation, and there's not that much out there on this topic, I wanted to do a little tutorial here, too. As a result, this post is going to be a long one, with lots of photos, so please make sure you are sitting comfortably. 

Outfit

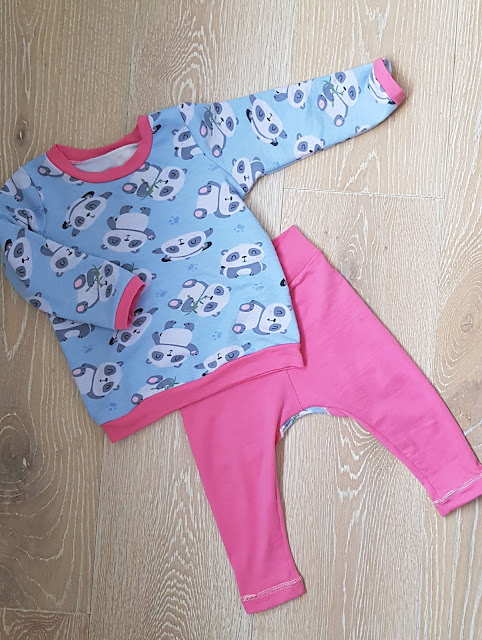
First of all, a few words on the project. I bought this lovely Panda French Terry even before Freya was born, as pandas are obligatory for a half Chinese baby, right? 
brindille twig ringer tee mother grimm lockley leggings panda flatlock tutorial
I knew I wanted to make a long sleeve Ringer Tee with it, but wanted to complete the outfit without there being pandas everywhere. Then the light bulb moment came - bum panel leggings! 

brindille twig ringer tee mother grimm lockley leggings panda flatlock tutorial
I almost self-drafted the bum panel from the tried and tested leggings pattern, but then I came across the Locksley leggings by Mother Grimm. Having spent 4 years living in Cardiff, I have developed quite a soft spot for the Welsh people, who welcomed me wholeheartedly to their country when I was still a fresh faced teenager. I couldn't pass the chance to support an independent (tick), Welsh (tick), sewing-related (tick) business. 
brindille twig ringer tee mother grimm lockley leggings panda flatlock tutorial
Both the top and leggings were made straight out of the envelope, so to speak, in size 9-12 months. Both patterns were great, and an easy sew. The only tricky thing was the flatlocking, which I'll get to now! 
brindille twig ringer tee mother grimm lockley leggings panda flatlock tutorial
Tutorial

What is flatlock? 

Strictly speaking, you need a special, industrial machine to do a proper flatlock. It is a stretch seam with basically no bulk, which is why it's often used in activewear.
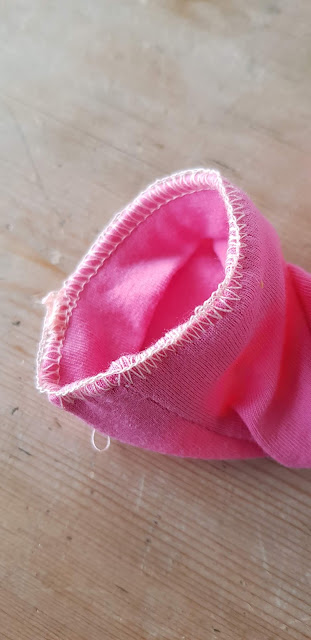
What I'm showing you today is a flatlock stitch done on an overlocker (or a serger, for those sewing friends across the pond). As I'm doing a "strong flatlock" (or "lapped flatlock"), it is not completely bulk-free, but as the seam allowance overlaps within the stitching, this seam is much more comfortable against the skin compared to a normal overlock. [*NB - you can achieve a complete bulk-free flatlock on an overlocker, but the resulting seam is much less strong and secure, so I don't like to use it on leggings. See the hemming section below).]

What you'll need
  • An overlocker/serger
  • Its manual
  • Matching/contrasting  thread

Machine settings

Please refer to your machine manual here. What we are doing is a wide, 3-thread flatlock with the left needle, which means that the left needle will need to come out. The tensions depend on your specific machine, and the fabric that you are working with, but for your reference mine are 0.5, n/a, 5 and 7. These are what my machine recommended for medium-weight fabrics, and worked a treat. I also leave my cutting blade engaged.

Preparation 

Before we start flatlocking away, I like to prepare the pattern pieces. The actual sewing part is quick and fun, so let's be patient with the preparation part :)

A key consideration here are the seam allowances, and this comes in two parts.

  • For the seams that you are flatlocking, the seam allowances will end up overlapping. My flatlocked seam is approx 5mm (the same as my wide overlock), and the pattern calls for a 10mm seam allowance. This means that I need to trim an extra 2.5mm (approx 1/8 inch) off these seams to enable me to sew them up as usual. In other words, I am trimming off the 2.5mm now from these seams on my cut pattern pieces before sewing, so that when I serge, I'm able to place the fabric in the "normal" position against the blade, trimming off the "normal" amount. Alternatively, you could do nothing now, and trim and extra 2.5mm as you sew, but this tutorial follows the method above. 
  • Secondly, for the seams that will cross the flatlocked seams, I trimmed the full extra 5mm off the seam allowances before sewing. This is because the flatlocked seams, although strong, are harder to secure. I secure them (as detailed below) with a few steps, but if you end up then cutting the tied ends off as you sewed your next seams, you have a risk of the flatlocked stitch unravelling. This step therefore requires you to consider all the seams that cross the flatlocked seams, and for these leggings, they are the inseams and waistline seams, as well as the waistband seams. 
Let's get sewing!

It goes without saying that you should try this stitch on 2 layers of scrap fabrics of the same weight first, before working on your actual garment. 

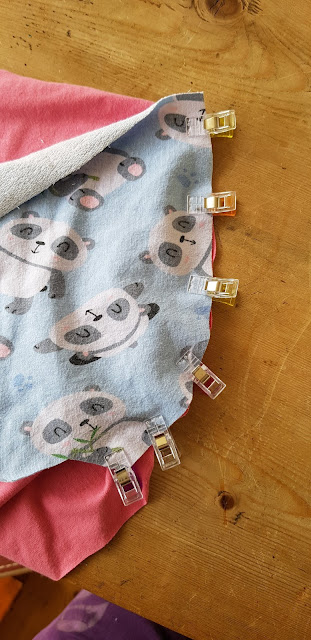
For a traditional flatlocked look, pin or clip the pieces with wrong sides together. I'd like the flatlock to be on the panda (rather than pink) side, so the panda side is facing up. This will make sense in a minute, I promise. 
brindille twig ringer tee mother grimm lockley leggings panda flatlock tutorial
Sew a long thread chain first. Then, place the fabric in the usual position next to the blade (see explanation in the prep section above). Check again that you have the wrong sides together, and start serging as normal. Once the seam is finished, continue sewing until a long thread chain is formed. 
brindille twig ringer tee mother grimm lockley leggings panda flatlock tutorial
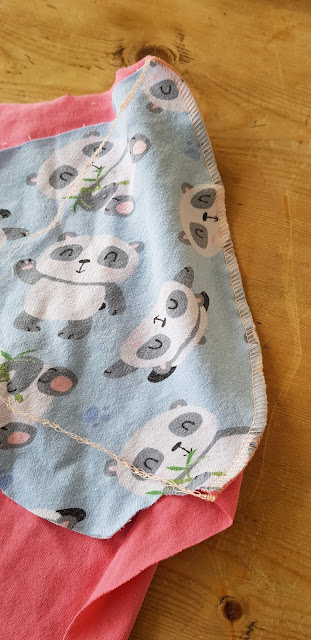
You should have a seam that looks quite similar to an overlock, but a bit more scrunched up. The tension is a bit off, but this is okay as we want the off tension on purpose. 
brindille twig ringer tee mother grimm lockley leggings panda flatlock tutorialUse your fingers to even out the stitching slightly. This is where the long thread chain comes in handy! You'll be amazed by how much of it unravels as you even out the stitch. If you are flatlocking a long seam - leave an extra, extra long tail. 

This is what my seam looks like. 
brindille twig ringer tee mother grimm lockley leggings panda flatlock tutorial
Next, the magic step! Pull your fabrics on both sides so that the stitching loosens up. The seam allowances should overlap each other, and the loopers should appear on the right side of the fabric, enclosing the seam allowances on the panda (or your equivalent) side. Note - you must complete this step before sewing your next seams.  

So we have on the right side:
brindille twig ringer tee mother grimm lockley leggings panda flatlock tutorial
And wrong side. Note that if you prefer the ladders look, and want this on your right side, this is easy to achieve. Instead of pinning and serging wrong sides together, pin and sew with right sides together. 
brindille twig ringer tee mother grimm lockley leggings panda flatlock tutorial
You have a flatlocked seam! Now we just need to secure it. I go a bit crazy here, so I tie a knot (top tip - use a pin to position the knot close to the fabric - pictured below), fray check, and I also bar tack it within the seam allowance. And since I've already trim the other pattern pieces that will be intersecting the ends of the flatlocked seams, I know that I won't be trimming the secured ends off. This should make sure that your beautiful seams stay that way. 
brindille twig ringer tee mother grimm lockley leggings panda flatlock tutorial
That's it! Easy, right? 

Bonus points!

Want more? Sure! Some extra points for you. 
1) Don't have an overlocker? You can fake this with a sewing machine - see Taisia's tutorial here
2) This stitch could be used as a decorative detail, too. For example, it looks great on a raglan tshirt. 
3) It can also be a nice stitch used for mending ready to wear clothing
4) You could have a matching flatlocked hem, too! 

What I've outlined above is where we have the seam allowances overlapping each other (what I'm calling a "strong flatlock"), rather than having them next to each other and meeting in the middle (more of a true flatlock). For 2), 3) and 4) above, we need to aim for less bulk, and therefore the true flatlock. 

Let me demonstrate it on the hem. With hindsight, I'd actually recommend that you hem with a flatlock flat, rather than in the round. In other words, it would be better to sew the hem before the inseams. You could then start and finish in the seam allowance, so that the thread chains/ends will be nicely hidden in the inseams. 

First, fold your hem once to the wrong side as usual. You'll want to fold the full depth of the hem required for your pattern. 
brindille twig ringer tee mother grimm lockley leggings panda flatlock tutorial
Then fold again to the wrong side, by exactly the same amount. To achieve a neat hem, it's crucial to fold exactly the same amount over in these steps, making sure that the raw edge is right on the second crease/fold. You might find that pressing helps here. 
brindille twig ringer tee mother grimm lockley leggings panda flatlock tutorial
Next, disengage your cutting blade. Position the fabric slightly to the left so that the left needle catches the fabric, but the loops are hanging off the fabric. Before you sew on the fabric, remember to leave a long thread chain again at the start and end.  
brindille twig ringer tee mother grimm lockley leggings panda flatlock hemtutorial
See what I mean? Some of the stitching are on the fabric, and some off. 
brindille twig ringer tee mother grimm lockley leggings panda flatlock hem tutorial
 Now unfold the second fold, and pull flat. You should have on the outside: 
brindille twig ringer tee mother grimm lockley leggings panda flatlock hem tutorial
 And inside: 
brindille twig ringer tee mother grimm lockley leggings panda flatlock hemhem tutorial
Isn't it neat? Again, if you prefer the ladders, fold the opposite way - fold hem to the outside, and then again, before sewing as above. Now secure your thread chains, and you are done! 

Tuesday 4 June 2019

Baby jacket with bunny ears

I'm absolutely delighted to share my latest collaboration with Flamingo Fabrics. Since having Freya, it's been one of my favourite websites to browse, drool over, and purchase from (this dandelion French terry used in my latest dungarees was from there). So imagine my response when the lovely Dorota asked me to write a guest blog post.  
ikatee grand'ourse jacket ears
The Ikatee Grand'ourse has been on my to-sew list for quite some time, and I love my first version from it. I say first, because I know that there will be many more.
  ikatee grand'ourse jacket ears

ikatee grand'ourse jacket ears
Read more about the project, and my pattern review on the Flamingo Fabrics blog here! 

Monday 27 May 2019

Leggings, bummies, and DIY size label

As Freya starts to grow out of her 6-9 clothes, I've been working on some wardrobe essentials for her in 9-12. 
Brindille Twig Bummies Leggings
I made another pair of the trusted leggings by Brindille & Twig, and unlike last time, without drama. 

I also tried out their Bummies pattern, which is available for free!  I opted for the leg bands, and omitted the drawstring. They have been great for the recent warm days, mainly as a neutral-coloured nappy cover under a little sundress. 

The fabric was a combed cotton jersey that I picked up on Black Friday last year from Girl Charlie. 
Brindille Twig Bummies
Both are such easy sews, and let me warn you now that I'll no doubt be making more versions of these in the years to come. 

One thing I have not had to worry about before now was size labels. Apart from when I was sporting a huge bump, my size has been pretty constant. But churning out clothes for a rapidly growing baby is a whole new ball game entirely. Suddenly, we needed to know the size of every item, especially when I'm not the only person that dresses our daughter. 
Brindille Twig Bummies Leggings DIY label

After gathering some bits from my stash, I made a few DIY size labels. I wanted them to be clear, rustic looking, and comfortable against the super soft baby skin. I liked how they turned out, so wanted to share with you what I did in case it helps anyone. 

What I used:
  • 3/4 inch (19mm) wide white cotton twill tape
  • Stamp set with numbers and letters (each stamp here is sized 12x9mm)
  • Inkpad - I used a Versacraft one which is good for fabric
  • An iron

The rest is pretty simple. I cut a 6cm+ long strip of twill tape. Leaving around 1.5cm blank from the top, I did the 3 stamps snugly (and the width of the twill tape was perfect). Once dry, I ironed the strip over a pressing cloth (a bit of silk organza) for 20 seconds, on a cotton setting without steam (some say 2-5 minutes, but even with the iron moving, my tape and the ironing board cover got scorched after less than a minute). Once cool, fold your strip in half, and you should have 1.5cm of seam allowance above the stamp. You can trim down the seam allowance if necessary. Sew into the seam as desired. 

For these bummies and leggings, I sewed the label onto the centre back when topstitching the folded serged waistband elastic, with my normal 3-step zigzag.  I've actually batch made a few labels, including for the next size. If you wanted to do this, just remember to give the stamps a quick wipe after each stamp, so that you don't get too many ink "boxes" around the letter/number. 

Of course, you can get creative with this, playing with the size of tape, stamps, angles etc. I have a few funky stamps in my stash from the wedding planning/thank you card days, and may well experiment with a few designs next! 

Monday 20 May 2019

Dandelion Dandelion Dungarees

I've got yet another pair of Dandelion Dungarees. New and improved this time! See my last versions here and here
poppy and jazz dandelion dungarees
I found the most fitting fabric for these dungarees. A dandelion print French Terry for Dandelion dungarees. Need I say more? 

Onto the design changes and alterations. 

The last two versions were made in size 3-6m, which saw Freya through the winter months nicely, since they were fully lined and warm. For the summer months (and hopefully warmer weather) to come, I wanted something cooler and lighter, so I went with a bodice lining only this time. 

I also added cuffs at the ankles (shortened legs by 2cm, but added 4cm deep cuffs), in an attempt to maximise the longevity of these 9-12m dungarees whilst minimising any tripping hazard. 

If you were wondering how I constructed the dungarees with the bodice lining only, the very talented Melissa demonstrates it here much better than I ever could. 


poppy and jazz dandelion dungarees

Another change I made was raising the poppers so that they sit 1.5 inches higher, almost on the shoulders. As much as I loved the last 2 makes, if I were to nitpick, I wasn't entirely happy with how the straps were sitting. Also, the way the pattern is drafted is such that the front and back pattern pieces are identical; as a result, if you are using a directional fabric (which, let's face it, many cute children's fabrics are), the print on either front or back part of the strap will end up upside down. Raising the poppers by 1.5 inches (and cutting the straps as part of the back piece) addressed this. I used 2 sets of poppers again this time, again, for longevity of wear. 
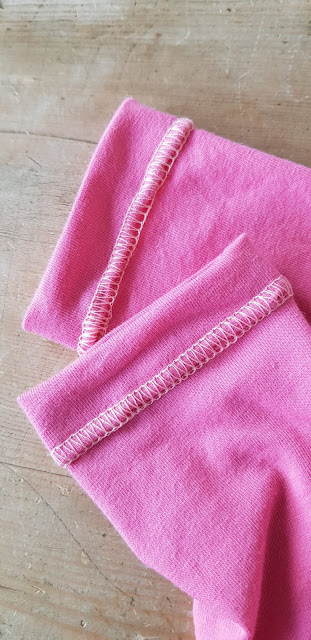
Finally, I raised the centre back by an inch, as I prefer the look. 
poppy and jazz dandelion dungarees
I'm really pleased with how these dungarees turned out! I think Freya likes them, too! They are a little big on her at the moment (she's not yet 9 months, and these are extra long 9-12m) but I think she will grow into them nicely. By the way, I have a funny feeling that she's gonna develop a nice habit of "modelling"/wearing clothes that are slightly too big for her in the months and years to come, especially when they are made by mummy! 

Thursday 17 January 2019

Papercut Anima Joggers

I live in joggers. Before baby, and even more so, after baby. Changing into joggers from work clothes used to be the first thing I did when I came home. These days? I won't lie - sometimes I even pop out of the house in what I would consider a "nice" pair. It's all about lounging! 
It is quite surprising, therefore, that I had not sewed up a pair of joggers until now. Don't get me wrong. I had every intention of sewing joggers, for years in fact. Want proof? These joggers are sewn with a lovely sweatshirt fleece fabric that I bought for this project from the Garment District 4.5 years ago. I have no idea what's taken me so long! 
The pattern is the Papercut Anima Pant. It was a toss-up between this and the True Bias Hudson. Both have a modern tapered shape, cuffs, elasticated waistband and pockets, but I think the faux fly front swang it for me. I do, however, have the Hudson Men pattern in my (PDF) stash, so it'll be interesting to compare notes when I get to make a manly pair for my hubby. 
The construction was straightforward, even the faux fly was easy to follow. The only crisis was that when I shortened the legs, I took off a whopping 5 inches rather than the intended 2.5 inches. I blame baby brain! I almost threw the unfinished project in the bin. Seriously, there were almost tears. However, when I compared the length to a RTW pair of joggers that I love, I decided to soldier on, and applied minimal seam allowances when attaching the cuffs. And you know what? The length is actually perfect. It just begs the question - how short AM I?! 
The only other thing on the construction was that I was not 100% sure whether to use a stretch stitch when topstitching the waistband to create the channel for the tie. After testing it on some scrap fabric, I decided that a straight stitch would do the trick, stretching as a sew, especially given that my fabric isn't that stretchy to begin with. I'm pleased to report that it worked just fine. 
And here I am, in my comfy new Papercut outfit: Anima joggers teamed up with the Undercover nursing sweatshirt. Match made in heaven. 
Related Posts Plugin for WordPress, Blogger...