Showing posts with label vintage sewing pattern pledge. Show all posts

Sunday, 1 November 2015

Vintage skirt with inverted pleat

Hello all, hasn't it been a while? Hope all is well with you guys! 

Over the last couple of months, I've kept myself really quite busy -- settling into my new job, doing a bit more decorating before the days became really short, and then enjoying a wonderful road trip along the west coast of the US to celebrate the hubby's 30th. It's been a fantastic couple of months in many ways, but the one thing that did suffer during this busy time was my sewing. 

However, with the new job all going very well (yay), and the days much colder and shorter (and foggier, if today is anything to go by!), I'm back where I belong - my sewing room

What better way to resume sewing than a very on-trend inverted pleat skirt from a vintage pattern? 
Vintage Simplicity 6091 inverted pleated skirt
Please excuse the dim photos - I waited and waited this afternoon for the fog to clear up, and longed for some natural light to come into the house, but had to give in to some artificial lighting in the end, as I just couldn't wait any longer before sharing the project with you ;) If the hounds tooth pattern isn't showing up too well, click on the image to enlarge and it'll look less fuzzy, I promise. 
Vintage Simplicity 6091 Inverted Pleat Skirt

The pattern is the Simplicity 6091 from my stash, from 1965. To think that it is an entire 50 years later that I'm picking it up and making my own version is pretty incredible.  
Vintage Simplicity 6091 Inverted Pleated Skirt Pattern

The fabric that I used - as you can see from the John Lewis reduced to clear label below, it's quite a mix, with 65% poly, 32% viscose and 3% spandex. The end result of this funky mix is a beautifully soft, slightly stretchy, and comfortable to wear fabric, but one that ravels like there's no tomorrow. In fact, it was ravelling so fast that I felt rushed to finish this project in 3 days; even then I was worried that I would wake up the next day and only find unravelled thread all over my sewing room, with the half-finished skirt nowhere to be seen! 
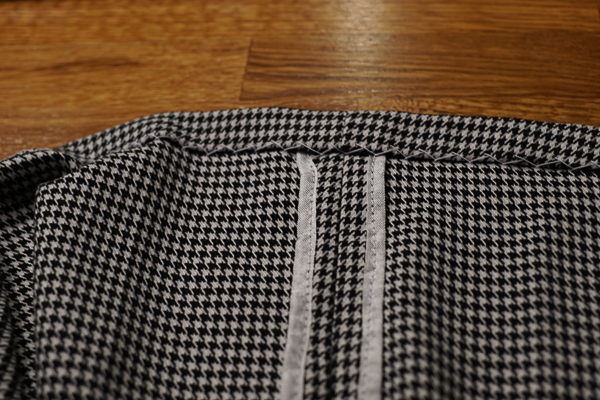
This is also why I opted to finish the seams with some rayon seam binding, which I picked up from the Garment District in NYC over a year ago. This is the first time I've used this stuff, and all the other sewers are right - it is amazing! This tutorial by Laura Mae was very informative, and set me on the right path straight away.  

Vintage Simplicity 6091 Inverted Pleated Skirt Rayon Binding
Vintage Simplicity 6091 Inverted Pleated Skirt Waistband

In addition to the seam binding finish, I had another few firsts with this project: I made my first inverted pleat (it was pretty straight forward), and more importantly, this was the first vintage pattern that I used that did not require any real pattern alterations! Hooray! All I did was cutting 6 inches off the length, and off I went chopping up the fabric! Thank you, Simplicity! 

One more close-up photo -- topstitching above the inverted pleat
Vintage Simplicity 6091 Inverted Pleated Skirt topstitching

So there you have it, my first vintage make of 2015, based on a pattern from exactly 50 years ago! What this also means of course, is that I'm not doing terribly well with my Vintage Sewing Pattern Pledge of sewing 3 vintage patterns this year... But hey, there's still time ;) Stay tuned and I'll be back soon, and hopefully with another vintage make! 
Vintage Simplicity 6091 Inverted Pleated Skirt

Sunday, 7 September 2014

Mint robe - Vintage Butterick 7056

Hello readers, I hope you are enjoying a lovely weekend wherever you are. If you haven't done so already, you still have one week to enter the Blogiversary GIVEAWAY! What are you waiting for?

It's been a while since I shared a sewing project with you, but I finally have one all ready -- sewn, pressed and photographed :)

It's a "tailored robe", made from a vintage pattern, Butterick 7056. It's fabulous. The copy of the pattern I had (in bust size 30) isn't in "mint" condition (get it?), as the envelope has disintegrated on all 4 edges, but given that it's survived all the way from 1950s, I was pretty happy to just be able to get my hands on it. 


There were a couple of pieces missing, including the front piece, but thankfully the front lining piece was included, which helped a lot. I made view A, the short version, and didn't bother with the pockets. 

I made this in a mint polka dot viscose (or rayon, for those of you across the pond), a purchase from my NYC trip in June, from a store called Fabric for Less in the Garment District, at $5 a yard. I fell in love with it as soon as I saw it -- I loved the pastel colours, which are very calming to look at. And as you probably know already, I always have a super soft spot for a super soft viscose. I knew straight away that it would make the perfect robe.   


As much as I love 1) vintage sewing patterns and 2) viscose, I had some trouble with this project. Viscose isn't the most stable fabric, and with the long lines of stitches for the top to bottom front and back pieces, as well as the super long facing at the front, as well as the tie, the fabric moved a lot with the ordinary presser foot, and more specifically, the top layer of my fabric kept creeping forward, wanting to be long! I realise that it is not the first time I'm having this problem, and I did encounter this when making the Giant Baby Blanket, but usually after a few times unpicking and sewing again, I can smooth it out.

But not this time. Not with viscose, or a facing piece that's almost 3 metres long (ok that's an exaggeration, but you get the idea). After painstakingly unpicking, sewing, unpicking, sewing, and unpicking again, I decided that enough was enough, and it's time to invest in a walking foot. And boy, what a difference it makes! I took off the presser foot, the shank, and attached the walking foot, and off I went. All sorted in one go, with no fabric creepage. It was so easy. 

If you haven't discovered or invested in a walking foot yourself, I found this helpful post which describes it well. My advice? Get one now, and it will come in handy some day. I had to wait for mine to come in the post, but it did give me a bit of breathing space to get over my frustration with the facing. 

The other issue with viscose is that it wrinkled really really easily. When I sewed everything up, the end product didn't look very appealing at all. But after a careful press, didn't it sharpen up nicely! Crisp lines, and a beautiful drape, and let's not forget just how wonderfully soft and luxurious it is. No wonder it is also known as the artificial silk. 

So there you have it, my new robe, for wrapping me up in the mornings, or on a lazy day (until it gets too cold!). Look, I even have a bra to make it a matching outfit! 


It's a bit of a departure from my usual makes, as I have only made clothes that are designed to be worn outside of the home. But this project, which I have no intention of wearing outside of the house, has brought me a wonderful sense of satisfaction. What will be next? Pyjamas? Underwear? Only time will tell ;)

How about you? Have you made items that will not been "shown off" to the general public? And do you enjoy making them all the same?

Wednesday, 4 June 2014

My first maxi skirt - a vintage make, and help please!

Hello my dear readers, I hope you are having a good week and are looking forward to the weekend. I'm flying off to NYC on Friday for a quick weekend break, before heading to Houston for a week on a work trip. I'm super excited about NYC, not to mention the fabric shopping in the Garment District all day on Saturday (I'm writing a long list, and bringing my big suitcase), and am pretty happy about the work trip - it will be a nice change.  

I have something a bit different to share with you today. I made my first ever maxi skirt! It's not just the first maxi skirt that I've made, but also my first maxi skirt altogether. It's not that I don't like maxi skirts, in fact I love the look, but I was never convinced that I could pull it off. Being a petite person I didn't want to be drowned in it, but lately I've decided to be brave, mainly as they look so damn comfy, and I kept seeing them in fashion magazines right, left and centre. 

So here is my version: 

Although I really like the look of fuller maxi skirts, I didn't think they would suit my small frame. Instead, I opted for a slimmer silhouette, and used a vintage pattern, Butterick 5884, as a base. Marie-I hope I'm making you proud ;)


I was lucky enough to win this pattern from the Sew Grateful giveaway on Gloria & Me, and I am very grateful indeed! Isn't this a beautiful pattern? This is actually the first unprinted vintage pattern that I've worked with - in fact, I had no idea they even existed until I saw them on the Great British Sewing Bee, so you can imagine my excitement when I laid my hands on this little beauty!   


Here's the instructions to de-code to the secret language, and they were very helpful! 

As you may have worked out by yourself based on the above, the skirt is cut on the bias. The main alteration I made was to lengthen the skirt by 8 inches or so, to make it a maxi length.

I'm sitting in front of a 13th century bridge, 5 mins walk from my house. Doesn't it look incredible for its age? This was the starting point of a beautiful riverside walk, and I love taking a stroll there on a sunny day, even if I felt a bit overdressed for it! 


And this is the Common Meadow that follows: 


What's the fabric, I hear you ask? You may remember the little tale that I told you last week in the Jamie shift dress post, and this is indeed the matching blue viscose that was the other side of the equation. It is even more drapy when cut on the bias, and not to mention really comfortable to wear. 

I even made French seams on the inside for the delicate fabric, and I love how neat it looks on the inside. The other good news is that I finally feel happy with working with viscose, after some puckering issues in the past. To sum it all up, I think the tricks are:


  1. Use a smaller needle - I used a size 70 this time, but switched to a 90 (normal) when sewing more than 2 layers of fabric together.  
  2. Larger stitches - I increased the stitch length to between 3 and 4 on my machine
  3. Very loose tension - I turned the dial down to almost 1, and I suspect this was the main reason behind the puckering issues previously as I only used to turn this down to around the 3 mark, as my machine manual suggested. But this time I thought, what's the point of having the scale all the way down to 1 if I wasn't going to use it? and it worked! 
With the beautiful drapiness there came problems, though, and for this, I need your help! 


Can you see the bunching around the zip on the left side seam (right on the photo)? And here's a close up from the side:


And from the front:

Not attractive.  The worst part is, I saw this whole thing coming. The fabric is quite a thin one, and as the pieces were cut on the bias, it stretches out of shape easily. So before I inserted the lapped zipper, I strengthened the seams with some grosgrain ribbon to prevent this... and it hasn't worked, even after unpicking and re-attaching the zip 4 times :(    

So, any help you could offer either to help me fix it or prevent it from happening again would be very much appreciated!   

Despite the issue, I am pleased with how the maxi skirt has turned out, and teamed with a cropped top (the top I'm wearing is not actually a cropped one, I just tied it at the front for the effect), I don't think it shrunk me any more than my "normal" clothes... I think I will be able to look past the bunching issue, and wear this skirt again. At the end of the day, who stares at your hip when you walk past anyway?


That's all for now folks, and as always, it would be great to hear from you! 

Sunday, 30 March 2014

Mad Men challenge 2014 - my entry

Hello all, I hope you’ve been enjoying the sunny weather this weekend! It’s been lovely here in the UK! And if it hasn’t been very sunny where you are, I hope spring will come soon for you, too (unless you are on the other side of the planet, in which case I hope you hold on to the summer a little longer!).

Speaking of the other side of the planet, the lovely JuliaBobbin from down under has once again organised the fabulous Mad MenChallenge, and here’s my little entry this year.


So I made Betty’s super girlie floral blouse, in a ditsy floral cotton in more of a pink/red tone compared to the green/blue/red fabric that made Betty’s blouse. This is more of an “inspired by” as opposed to “copycat” attempt.


I used the vintage Simplicity 3092 once again, and following my last attempt, I made quite a few changes to the pattern for a closer match to Betty’s blouse and a better fit:
  •  I lowered the neckline to accommodate a collar with an “integrated” collar stand;
  •  I made the plackets more narrow to match the smaller buttons;
  •  I increased the SBA for a better fit (and played around with the side seams and darts until I was happy with the ease); and
  • I made the shoulders more narrow.

Here’s what the whole blouse looks like, without the map in the way:

Betty teamed her blouse up with a cute coral cardigan, so I couldn’t resist the temptation:


I am in love with this little number. Naturally I have a soft spot for pretty florals, and this fabric simply bursts with prettiness and happiness – looking at the blouse puts a smile on my face every time. I know I’ll get lots of wear out of this cutie this spring/summer! I can see it teamed up with a smart work skirt, casual skirt, jeans, or even shorts, and with or without a plain cardie. What’s not to like?

In addition to this, I also entered my picnic dress which I made a good few months ago into the challenge, as who else, it was Betty that inspired me. Maybe the obsession will calm down soon and I’ll make a garment inspired by another character next year (perhaps Megan? As I do adore her modern style)…  

For now, I’m just so excited for the big reveal, and can’t wait to see what you’ve all made! 

Friday, 7 March 2014

Geometric vintage blouse

Happy Friday everyone! 
 
Gosh, I'm smashing this vintage sewing pattern pledge that I've made just under a month ago! Here's my second item made from vintage pattern already, though this is from an original rather than a reproduction like my Vogue 1137. This was kind of my trial run for this year's Mad Men challenge, and I'm reasonably happy with how it's turned out. 

So I used Simplicity 3092 from my stash, and apparently it's from 1949! I attempted to make view 2, but in this amazing geometric stretch cotton from MacCulloch & Wallis in a dark navy, mustard and white. Admittedly it's not my usual type of fabric, but I think sometimes it's good to be outside of my comfort zone. 

You may recall that this is the top that I'd like to make, in a floral cotton, eventually:
 
I made quite a few changes to the pattern, to fit me and to get to a design that's similar to Betty's top -- I made my usual SBA, eliminated the armhole bands (and used a bias binding facing instead), widened and sharpened the collar, moved the placket facing to the inside (the original is designed on the outside) so that when the top button is undone, the reverse side that you see is not the wrong side of the fabric, as the original pattern is deigned to be worn with the button done up. Am I making any sense?! I also changed the order in which the placket and collar were attached to the bodice.

 
The eagle-eyed amongst you will have noticed that I'm wearing the top with my Navy Work skirt and Ultimate Work skirt, both creations from McCalls 3830 last year.
 
As I say, I'm reasonably happy with the blouse, and can see myself wearing it to work. There are a few niggles, though, but then that's exactly why I'm trying out the pattern before the real deal. So the things that I hope to improve in my next version are:

  • Adding a collar stand - currently there isn't one;
  • Reducing the armholes - they are a teeny bit too big;
  • Increase the SBA - there's a lot of ease and some excess fabric on both sides still, and at the back; and
  • Making the shoulders more narrow 
Next, a not so flattering photo (my arms look kind of chubby!), but it's a close-up, so I'm sharing it with you. Can you see all those darts cinching the blouse in at the waist? I think once improved, this could be a really shapely blouse, especially in a pretty floral fabric (back in my comfort zone, eh?) 


OK, finally a bit of a life update... Today's my last day in my current job and I'm moving house over the weekend! It'll be sad to leave Reading, but I'm moving to the leafy Surrey (anyone nearby?), and hopefully into a job that is less demanding (read: more time to sew!) Whoop! Then I've got a week off to do some works to the new house (including my new sewing room!), and lots of catching up with sewing! I think it'll be time for my Mad Men Betty blouse, or even blouses! And I may have ordered a certain fantastic pattern from By Hand London! Stay tuned ;)  

Saturday, 1 March 2014

Vintage Vogue 1137 - take one

Hello, my dear readers, I hope you are all having a lovely weekend, and it's not running away from you too quickly! I'm very excited to show you my first finished make for the vintage sewing pattern pledge

It's a reproduction vintage Vogue 1137, from the 1950s. I must admit that this was a pattern that has quietly sat in my pattern drawer for quite some time -- whilst I love how the drawing looks, and have seen various lovely finished versions on the blogsphere, the fact that it was reprinted in sizes 8-14 meant that it would've been a bit more work for me to grade it down to my size, so I had been putting it off and prioritising easier tasks instead... However, the pledge was just what I needed to get my arse in gear!     

My apologies if your eyes are struggling to focus. It's not you, it's me, and my fabric choice! 

This is take one, as I was going to use it as a test run for the graded size 6 pattern. What with it being a vintage production, and Vogue (don't get me wrong, I do love Vogue patterns, but you may have noticed that for some reason my go-to big 4 tends to be Simplicity, and I'm a lot less familiar with the Vogue sizing) and its V-neck, I wasn't exactly keen to cut into my beautiful Liberty wool just yet! So I found this medium weight (quilting?) cotton in the dizzying print, and had a go of it instead. 


Once I've traced a size 6, I did my usual SBA (due to the construction of the bodice, I used this method), and shortened the bodice, too. I also shortened the skirt significantly, as it was almost a mid-calf length, and I ended up cutting it above where the side vents would've been. It's a shame as I quite liked the look of the side vents, but midi skirts really aren't flattering on me, and I didn't want to compromise on the shape of the skirt to keep the vents. I didn't bother with the belt, as the shape of the dress was enough to cinch the waist in, and I was happy with the silhouette.   


One of my favourite design details on this pattern is the elegant v-neck back. The V is not as profound as at the front, but a lovely touch indeed. Speaking of the front V-neck, I love that, too! I'm not normally a keen wearer of V-neck garments, but I really liked this version as it's not too low, yet still maintaining the great pronounced V shape.   


The thing is, once I'd put it all together (it was a breeze, by the way) to test out the fit, I loved how it looked so much that I decided to finish it off as a dress. I didn't want to line it, though (or just line the bodice, as the pattern suggests), so I drafted front and back facing to finish the neckline, and did my usual single-fold bias tape facing trick for the armholes. By the way, I have now "consolidated" the tutorials (from other blogs) that I use often (in other words, can't sew without!) on the tutorials page, so that it'll be easier for me to refer to them every now and again, and also in case it would help anyone else. Trust me, they are tried and tested, and AMAZING tutorials.    

Armhole finished with navy bias binding as facing:
 The mock overlocked waist seam:

The front bodice and skirt darts at the waistline - all lined up (I think I've becoming more and more OCD these days) 
 Hand finished blind hem: 

So there you have it, my first version of Vogue 1137. And thank you, Marie, for encouraging me with your brilliant pledge idea! What do you think? I have a few other projects lined up at the minute, but I am now looking forward to making this in my Liberty wool, and even with the self-fabric belt! Watch this space! 

Monday, 24 February 2014

Sew Grateful Week -- GIVEAWAY!

Happy Sew Grateful Week, my lovely readers! 

Today is the GIVEAWAY day, and I've got a little vintage number for you!


It's an early 1960s pattern, in size 12/Bust 32. If you are participating in either the Vintage Sewing Pattern Pledge or Mad Men Challenge 3, or like me, both, then this could come in handy for you! 

I will run this giveaway till midnight (GMT) of this Sunday (2nd March) and will be happy to post to you worldwide! All you need to do is leave a comment below, and a winner will be chosen out of a hat, and announced on Monday!   

Good luck! xx

Thursday, 20 February 2014

Mad Men challenge 3 - I'm in!

Yippee! It's finally that time of the year again! What else, it's the Mad Men challenge organised by the wonderfully talented Julia Bobbin


You might remember that I participated last year (see my entry here), and let me tell you, it was soooo much fun! If you have the time, and are a fan of Mad Men (who isn't?), then it's time to join in! 

Do you also remember this summery little number? That was also Mad Men inspired! 

So for the challenge, I currently have my eyes on a couple of outfits from Season 6 (admittedly the style has moved on quite a bit by Season 6, but there are still some gems here and there): 

Image from AMC of course but copied from Instyle

It was lovely to see Betty all fresh and summery, and also slim and confident again. I like her "traditional" sense of style -- she is more of a 50s lady.

Again AMC image but linked from Instyle (you can also read about comments on Mad Men fashion by the show's costume designer!)

And I just love Joan's purple two-piece, despite mistakenly thinking that it was a dress. The neckline is lovely, and I adore the cute bow details. 

I can't wait to get started! I think my vintage pattern Simplicity 3092 view 2 will be a lovely base pattern for Betty's top (with a few tweaks, mainly for the neckline). At this rate, I'll be flying through my Vintage pattern sewing pledge ;) I'm still looking for a pattern for the shorts, but think I may just attempt it too, if I have the time. 

Update -- I have already tracked down 2 versions of Betty's lovely top in the sewing blogsphere! Here's Jane's version, and here's Ami's version. Aren't they both adorable?

So, are you participating this year? I'm looking forward to seeing what everyone's planning on making, and of course the finished projects! 
Related Posts Plugin for WordPress, Blogger...