Friday 23 November 2018

Sewaholic Renfrew top - nursing hack

This is a top that I made when I was in labour. True story. 

OK, I started this project when I was in my maternity leave waiting for the baby to arrive, but was about half way through when my contractions started. Since they were quite slow to get going, and in the calm spirit of hypnobirthing, I got on with my day and went to my sewing machine to finish this off. Good job I did, too, as it took about 24 hours before I went into "active labour". Isn't it lovely that my wonderful hobby of sewing got to form part of my positive birth experience?
I used the Sewaholic Renfrew pattern as a base, and basically followed Zoe's amazing tutorial to turn it into a nursing top. 
I have used the Renfrew pattern before, and used it as a base to make a maternity dress, but never got round to blogging it. 
Fabric looking familiar? This is the leftover Art Gallery cotton jersey from my Moneta dress. It's just as soft and cosy as I remember. The busy print was helpful in hiding the nursing access. 
The back is unchanged, straight from the pattern. 

For a project completed during labour, this has turned out quite nicely, don't you think? One maternity dress and a nursing top later, I am keen to try out the Renfrew pattern as a "normal" top next. Perhaps that can be a project for when I stop breastfeeding in a few months' time. 

For now, I am enjoying the special journey of trying out nursing hacks, and (spoiler alert) making a few things for the baby! 

Sunday 18 November 2018

Papercut Undercover sweatshirt - nursing hack

Let's talk about breastfeeding today. Unusual for a sewing blog, I know.

Motherhood has been very kind to me - I had a very positive, intervention-free water birth, and baby Freya has been one healthy and smiley baby.

The only big challenge that I've faced so far was the breastfeeding. Before Freya was born, I was told how breastfeeding is "the most natural thing",  how "babies will crawl up to your breast and if left on your tummy skin to skin after birth", and how "it shouldn't hurt", and at worst "it will be a learning curve for both of you". 

And what a learning curve it was! My initial experience did not feel natural, baby had no idea where to go and preferred her own shoulders to my boobs, and it was bloody painful. 

Despite attending 3 antenatal breastfeeding classes, no one had warned me about the stress about being solely responsible for baby's growth/weight gain in the early days, the pain from poor latch/engorgement/blocked ducts, and how much of my day would be taken up with a newborn baby attached (did you know that when they say, "feed every 2-3 hours", you are supposed to count that from the start of each feed, and each feed could take well over an hour especially in the early days?). 

Don't get me wrong, I get all the benefits of breastfeeding. I just would've preferred to be forewarned about the difficulty of it so that I could be better prepared mentally. The key, as I've learned, was patience, perseverance, and getting help whenever you can. I know that what I'm saying above will not be relevant for most of you right now (well done and thank you if you managed to read on and got to this point regardless)- but if you found this post via Google because you wanted to make some nursing tops in advance of the arrival of your baby, you've heard it from me - breastfeeding can feel quite unnatural and difficult to begin with, and that is perfectly normal. 

Papercut Undercover Sweatshirt raglan zip Nursing Hack

Right, back to the sewing! After persevering, and finally succeeding with breastfeeding, I wanted to give myself a pat on the back, and reward myself with a few homemade nursing tops. 

After seeing one of my friends in a nursing jumper with zips down the raglan sleeves, I was inspired to make one for myself, to see us through the colder months. The pattern that I chose was the Papercut Undercover hoodie, and I teamed it up with a very cosy multi-fleck sweatshirt fabric from Guthrie & Ghani, together with 8' exposed metal zips (although with hindsight, 9' zips would've worked even better).  


Papercut Undercover Sweatshirt raglan zip Nursing Hack
This is my first time using a Papercut pattern (although the Anima pants pattern has been in my stash for a while), and the first impression was great. I loved the packaging, and how robust the pattern and instructions felt (both pattern pieces are instructions are printed on a huge piece of brown recycled paper). Since I tend to trace out the pattern pieces for my sewing projects, I was very happy with this feature. 

One thing to note is that this pattern (and I understand, other Papercut patterns) come with a 1cm seam allowance. This was perfectly fine, though I had to keep reminding myself not to sew 1.5cm seams on autopilot. 

Papercut Undercover Sweatshirt raglan zip Nursing Hack
Here's how I've turned this pattern into a nursing top. It's not difficult, though as it turned out, this pattern was not ideal for this project, as the front Raglan seams are slightly curved. There are plenty of similar styled patterns out there, and the hack below should work for them, too. 
  1. Add 1cm seam allowance to the front sleeve seams, all 4 of them (2 on the front piece, and 2 on the sleeve pieces). This is to allow for an easy insertion of the zips later on. 
  2. Split the neck banding pattern piece into two, based on the ratio of the length of the front and back neckline. Add an inch or so to the length of both pieces. The banding should be shorter than the actual neckline length, so that it would lie flat when finished. 
  3. Interface these seams with strips of medium weight interfacing which extended slightly beyond the seamline. 
  4. Stablised the front neckline (the bit between the zips) with clear elastic. Colette has a very helpful tutorial here. 
  5.  Sew the sleeve back seams. 
  6. Attach the banding pieces to both front and back necklines. 
  7. Insert the zips to the front sleeve seams. The easiest way to do this would be to sew a centred zip, but I wanted to push myself and learn a new technique, so I added exposed zips here by following this tutorial
  8. Sew up the inside sleeves and side seams in one go. 
  9. Add cuffs and hem/band. 
  10. Tidy up the loose overlocker chains, and where the zip ends with the neckline bands with a bit of hand sewing. 

Papercut Undercover Sweatshirt raglan zip Nursing Hack
 And that's it! So simple, isn't it? 
Papercut Undercover Sweatshirt raglan zip Nursing Hack
I'm so pleased to have pulled off this project, (thank you Freya, for napping well, and thank you hubby for freeing me up in the weekends to sew!) and just love how cosy it is. It's had so much wear that I'm struggling to remember how I managed to feed Freya without it! I'm also confident that it will last me long past the breastfeeding days. A real winner, don't you think?  

Tuesday 13 November 2018

Sewing for baby!

baby quilted blanket brushed cotton diy
Hello, my name is Freya and I'm new here! 
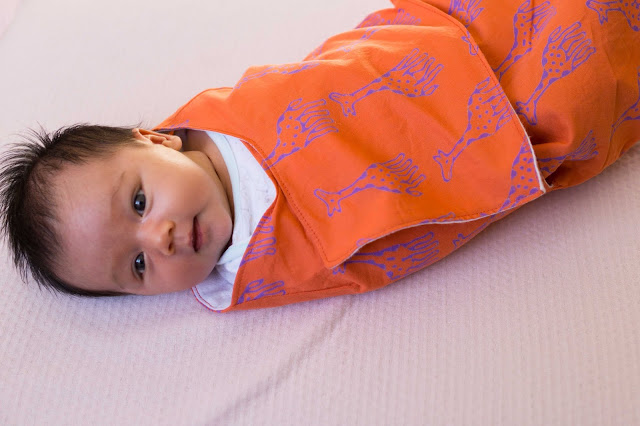
Lotta Jansdotter baby snuggler swaddle wrap
Not long after I was born, my mummy made me "model" the swaddle wraps that she sewed "for me" before I was born, although she was fully aware of my aversion towards being swaddled, and my incredible ability to wriggle out of them.

Lotta Jansdotter baby snuggler swaddle wrap
Don't worry though, I freed my arms within a matter of seconds! 

Then she made me pose on the nursing pillow with the cover that she sewed up... 
DIY nursing pillow cover
And you know what? She was absolutely right - having a spare cover has come in very handy indeed ;)

Alright, thank you Freya, that's quite enough baby talk for now. Mummy can take it from here. 

So, my darling baby daughter arrived 10 weeks ago, and our lives have truly been changed forever. My dear husband and I are both completely smitten, and we wake up every morning still in awe that a little person has joined our household! Sure, not everything is as we expected - after all, who knew that baby Freya would hate being swaddled so much after all the efforts that I've put in in sewing up those swaddle wraps? But we are both enjoying the lovely surprises and new challenges that parenthood has thrown at us so far, and are working very well as a team. baby padded play mat diy
Once we've moved past the precious early weeks (and made Freya pose in my earlier makes), I've been back to my sewing table. 

The first thing I made was a padded play mat for Freya, using some poly wadding, a piece of floral Cath Kidston cotton, and some polka dot grey polycotton (for the bottom layer - not photographed) from my stash. This has been a great stash busting project! 

Although we already had a "baby gym", I wanted something that would fold up small for that portability factor. And of course, this was super simple to make - I sewed the 3 layers together at the edges, leaving a few inches unstitched, turned it inside out, topstitched all around and voila - we have a play mat, and much more storage space in the sewing room! Freya has since spent quite a bit of time on it, and seems to enjoy it so far. 

baby quilted blanket brushed cotton diy

Having enjoyed the simplicity of sewing a big rectangle with the play mat, I then used up the leftover brushed cotton fabrics from the swaddle wraps, with some bamboo batting to make a quilted baby blanket. I basically used the same method (similar to these here and here), but added a couple of rows of stitching vertically and horizontally down the middle of the blanket to ensure that the bamboo quilting stays in place. 

This was initially made for wrapping Freya up warm in the winter months, so for now she is loving lying, and sometimes napping on top of it.  

It hasn't all been about the baby though. I'm very pleased to say that I have also managed a spot of selfish sewing, and made a few nursing clothes (I suppose this is still baby-related, but some of the nursing clothes will be worn beyondyond my breastfeeding days). Stay tuned and I'll be back to share some of these with you in the coming days, perhaps when Freya has another long nap! 
Related Posts Plugin for WordPress, Blogger...